Export Scene To Unity Reflect
Description
Unity Reflect is a solution provided by Unity Technologies to stream 3D data from some 3rd party 3D solutions, like Revit or Rhino (download the app here).
Pixyz Studio can also export to Unity Reflect, unlocking access to dozens more CAD & 3D formats for Reflect.
By a click of a button, you can push the meshes contained in an open Pixyz Studio scene to Unity Reflect (and Unity Editor), where you will be able to create on top some incredible virtual experiences, for collaboration purposes or on-site visualization, for example.
What 3D information can be exported?
When exporting a 3D model from Pixyz Studio to Unity Reflect, there are some restriction regarding what type of 3D information can be exported:
- Only the meshes (tessellated geometries) contained in a Part are exported. Other geometries like BRep surfaces, edges/polylines and points are not exported
- Point Clouds and animations are not exported
- A mesh is exported along with the following attributes: normals and UVs. Tangents and binormals are not exported (but computed on Reflect side)
- Instances are preserved
- All materials visually applied to a Part (as a Material Property, or applied to its patches or inherited from a parent) are exported, and converted to PBR materials in Unity Reflect
Which Parts are exported ?
By default, all Part occurrences (or Parts) present in the current Pixyz Studio scene are exported.
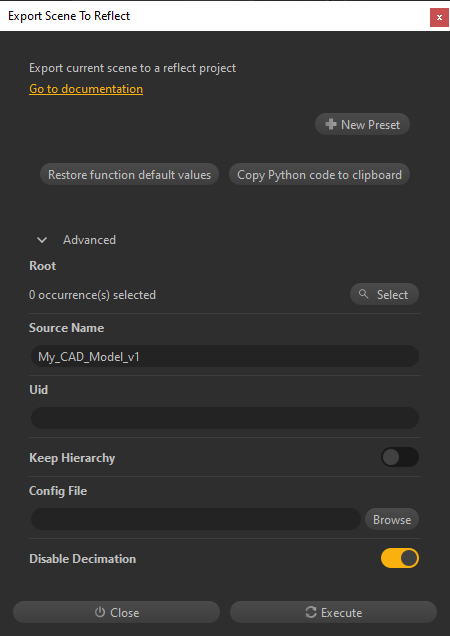
If you wish to export only a fraction of your scene, you need to specify a "Root" occurrence in the dialog box (in the "Advanced" tab). All the Parts children of this "Root" occurrence will be exported.
A selection of multiple Parts cannot be exported as is, a "Root" needs to be specified.
What about the Hierarchy?
Depending on how the parameter "Keep Hierarchy" is set in the "Export To Unity Reflect" function's dialog box, the hierarchy (or Product Structure) is processed differently at export:
- "Keep Hierarchy" is set to "False" (default):
- The hierarchy is destroyed
- All Parts are raked prior to export. Parts' transformations are "frozen", except for the instances which are preserved
- On Reflect side, one SyncObjectInstance (check out Unity Reflect documentation here) is created for each original Pixyz Part. They are processed and uploaded individually, allowing better performance (both on Reflect Server side and Reflect Review side)
- "Keep Hierarchy" is set to "True":
- The hierarchy is preserved
- On Reflect side, only one SyncObjectInstance is created for the whole set of Parts being exported, making it slower to process and upload
Export behavior
The export is push-only and does not support syncing. The export towards Unity Reflect will create new assets in the Unity Reflect project.
Identifying a push
For each export process (or "push") to Unity Reflect, a "Source Name" can be specified in the "Export To Unity Reflect" function's dialog box, to identify the push to Unity Reflect (see how below).
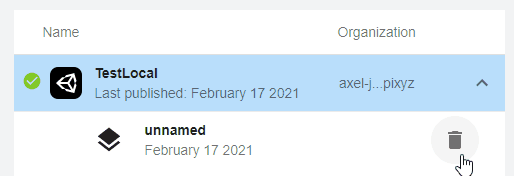
NOTE If a "Source Name" is not specified, Unity Reflect will use the string "unnamed" as the "Source Name"
A previous push can be deleted from the Unity Reflect Dashboard when prompted:
Overriding a previous push
Each push is identified by a unique ID (or Uid), that is by default automatically generated, and printed in the Output panel at the end of the export execution.
The user can specify his own specific ID by setting one in the "Uid" parameter:

Setting the Uid allows to replace a previous push: if the Uid specified by the user was already used in the Unity Reflect project to which the push is performed, the previous push will be overridden by the new push.
What about metadata?
Metadata stored on occurrences of the hierarchy of an imported 3D model are exported to Unity Reflect (more information about metadata here)
Exporting in headless mode
The Export To Unity Reflect function is also available in the Python API, so it can also be called in a scenario in Pixyz Scenario Processor, Pixyz automation/batching tool.
To avoid choosing the Unity Reflect target project through the Unity Reflect Dashboard (headless mode), the "Config file" parameter can be used, to get the targeted project from a Json file.
How To
To export the meshes to Unity Reflect from Pixyz Studio, follow these steps:
Step 1
Install Unity Reflect (more information about Unity Reflect setup here).
Step 2
Go to File Menu, and chose "Export Scene To Reflect", a dialog box opens:
Step 3
In the "Advanced" folder, specify a "Root" occurrence if you wish to export only a sub-assembly of the scene, and not the entire scene (which is the default behavior).
In the "Source Name" field, you can specify a name to identify the "push" to Unity Reflect you are about to make through the Unity Reflect Dashboard.
In the "Uid" field, you can specify your own Uid to override a previous push with the same Uid.
Use the "Keep Hierarchy" parameter to choose how the hierarchy is exported
Use the "Disable Decimation" parameter to choose if the exported meshes should be decimated or not (default) on Reflect Server side
Step 4
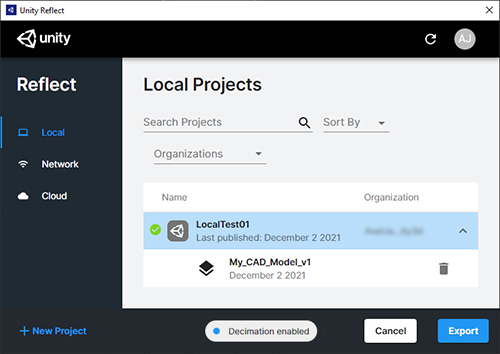
Press "Execute", a Unity Reflect Dashboard pops (providing Unity Reflect is installed and up to date, with a valid license).
WARNING If Unity Reflect is not found, the export fails and Pixyz Studio raises the error "An error occurred, please check that Unity Reflect is correctly installed and up to date".
Step 5
In the Unity Reflect Dashboard, define to which project you want to push the meshes.
Select a project and click "Export": the export of meshes actually starts (but Unity Reflect Review is not launched though).
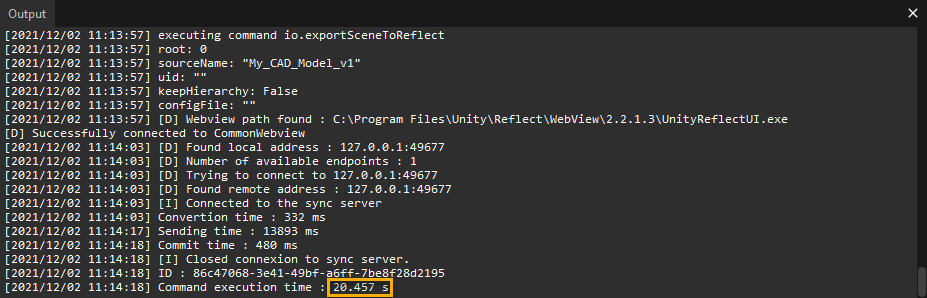
Back in Pixyz Studio, when the export is finished, the Output panel logs export information, including the execution time:
Step 6
Launch Unity Reflect Review (or a Unity project) to interact with the meshes pushed at the previous step.